Showing posts with label learning to cook. Show all posts

Saturday, 11 February 2017

World Peace Cookies Even the Tired Can Make

With a name like World Peace Cookies, you’d want to eat them by the bushel.  The fact they’re packed full of chocolate will transform everyone you know into a peace activist.  But the truth is, they can be slightly labour intensive if you don’t have an electric mixer.  More than slightly if, like myself, you have health issues.

So along with the recipe stolen from Dorie's Cookies, I’ll give you a few Hag Improvs for the energy impaired. 

Nary a knife slimed.

170g all purpose flour
28g unsweetened cocoa powder 
½t baking soda
155g unsalted butter
50g sugar
134g light brown sugar
½t fleur de sel or ¼t fine sea salt
1t vanilla extract
150g baking chocolate


Vegans =>  Substitute butter with a non-dairy margarine & make sure your chocolate is dairy free.

Cube the butter cold from the refrigerator to avoid sliming up the knife.  (A soft margarine won’t need to be cubed.)  A large sharp bread knife makes this easier than the eponymous butter knife, so wield the wicked blade & avoid an energy zapper.

Resident butter thief.
Cold butter is hard to mix into a dough or batter.  I put the cube plate on top of a plate warmer to soften the butter while I chop up the chocolate.  What you don't see in the photo is that the plate warmer’s inside the nuker.  That’s because I live with a Doodle whose thievery skills rival the Artful Dodger.  She not only can pick your pocket without detection, but has also lifted a Pyrex dish of cooling fish pie off the counter and onto the floor with only the softest of thumps.  AND she’d run past chocolate to steal butter.  Thus, the warming butter tucked safely out of Doodle harm. 

If you don't have a plate warmer, time will do the work for you & bring the butter to room temperature.  But if you do use a plate warmer, make sure that the butter doesn’t melt.  Your baked cookies will be flat & crisp if it does, rather than fat & chewy.

Break the chocolate into the pre-formed segments, then cut the segments in half.

In a medium bowl (not the one you plan to mix the dough in), sift the flour, cocoa & baking soda.

Ingredients for tomorrow's cooking.

On some days, that’s enough upper body work for me.  My Hag Improv for labour intensive recipes such as this, is to prepare the ingredients & store them in separate containers, leaving the mixing and/or cooking part until later.  I often use the time after dinner for congregating my fixings so that the next morning, I’m ready to bake.

Whenever it’s done, the next step is to cream the butter or margarine with the 2 types of sugar.  Once it’s smooth, mix in the salt & vanilla.  Add the sifted dry ingredients & stir until it’s nice & smooth.  


Dorie says her dough varies, but so far, mine is always a nice glossy ball that unfortunate leaves behind not a bit of chocolate to be licked from the bowl.  Lastly, add the chocolate chunks.

Separate the dough into quarters, then roll each quarter into a log that’s about 1.5” in diameter & about 12” long.  Double wrap each log in cling film & freeze for a minimum of 3 hours. 

How yum is that?

This gives you 4 cookie batches that you can cook all at once or take out of the freezer as needed.  If you have friends who pop over, they’re going to love you for your World Peace Cookies baked while they wait.  

If you’re an introvert, you may want to keep the little guys a secret, to avoid unexpected visitors.


When it comes time to have cookies, cut your dough into 1” slices – each log gives you a dozen cookies.  (Dorie cuts them in half inch slices, but an inch is the perfect size for me.)  If the dough crumbles, just bunch it together in a pile.  As it cooks, the pile will melt into a single cookie.

Bake on a paper lined tray at 190C/170 Fan/Gas 3 for 12 minutes.  They’ll look a bit under done when you take them out, but trust me, they’re perfect.  


Friday, 27 January 2017

Coffee Chocolate Brownies

Living with a great cook gives me the freedom to learn how to cook by making fun food - no one starves in the process.  When I decided to conquer one of El Punko’s favourite vices, the chocolate brownie, I didn’t expect the brownie to fight back. 

There was the-pan’s-too-big-so-I’ll-double-the-recipe fiasco.


Too brown & dry around the edges.

The turned-on-the-grill-not-the-oven debacle.


Burnt on the outside, raw on the inside.

And the Thanksgiving vegan brownies topped with icing, which weren’t too bad but weren’t kickass brownies. 


Thanksgiving Day Brownies

Every couple of weeks, I’d research & practice.  Eventually, I developed my own recipe which is heavily influenced by the real cooks who came before me. 

400g cooking chocolate
250g butter or baking margarine
2T instant coffee
3 eggs
125g caster sugar
125g muscavado sugar
1t vanilla extract
90g self raising flour
200g chocolate chips

For vegans, check that your chocolate & margarine have no dairy products in them, then substitute 1C applesauce for the eggs (standard substitution of ⅓C applesauce per egg).

Preheat oven to 190C/170C fan/Gas 5.  Grease a 30x23cm baking tin, line the bottom with greaseproof paper, then grease the paper. 

A note about baking paper.  I’ve found that store brand paper doesn’t usually come away from the baked goods very well, regardless how many surfaces I faithfully grease.  Siobhán has long used a silicon coated parchment paper that she found in the local farm shop.  It can also be ordered online.

My double boiler set up.
Set up some type of double boiler apparatus to melt that chocolate & margarine together.  For mine, I pour a bit of hot water from the kettle into a small saucepan, set it on a medium heat, then use an old Christmas pudding bowl that rests perfectly without falling in.  

Put the margarine in first & break the chocolate into it to make all the melting happen faster.  The first time I did this, I broke the chocolate into the pre-fab sections, then cut each of them in half.  A total waste of time.  The chocolate melts fast enough in pre-fab segments.  

So while you’re preheating & melting . . .

Let this cool slightly before adding to mix.

In a large bowl, dissolve the coffee in enough hot water to make it liquid.  2T of coffee give the brownies a nice caffè mocha under-taste, but you could use more for a stronger coffee flavour.  Add the vanilla extract, sugars, & eggs or apple sauce, & stir well.  Mix in the slightly cooled chocolate & margarine.  

Lastly, stir in the flour & then the chocolate chips.  If you like walnuts bits in your brownies, add about 175g now.  (I find this recipe too rich for walnuts.)

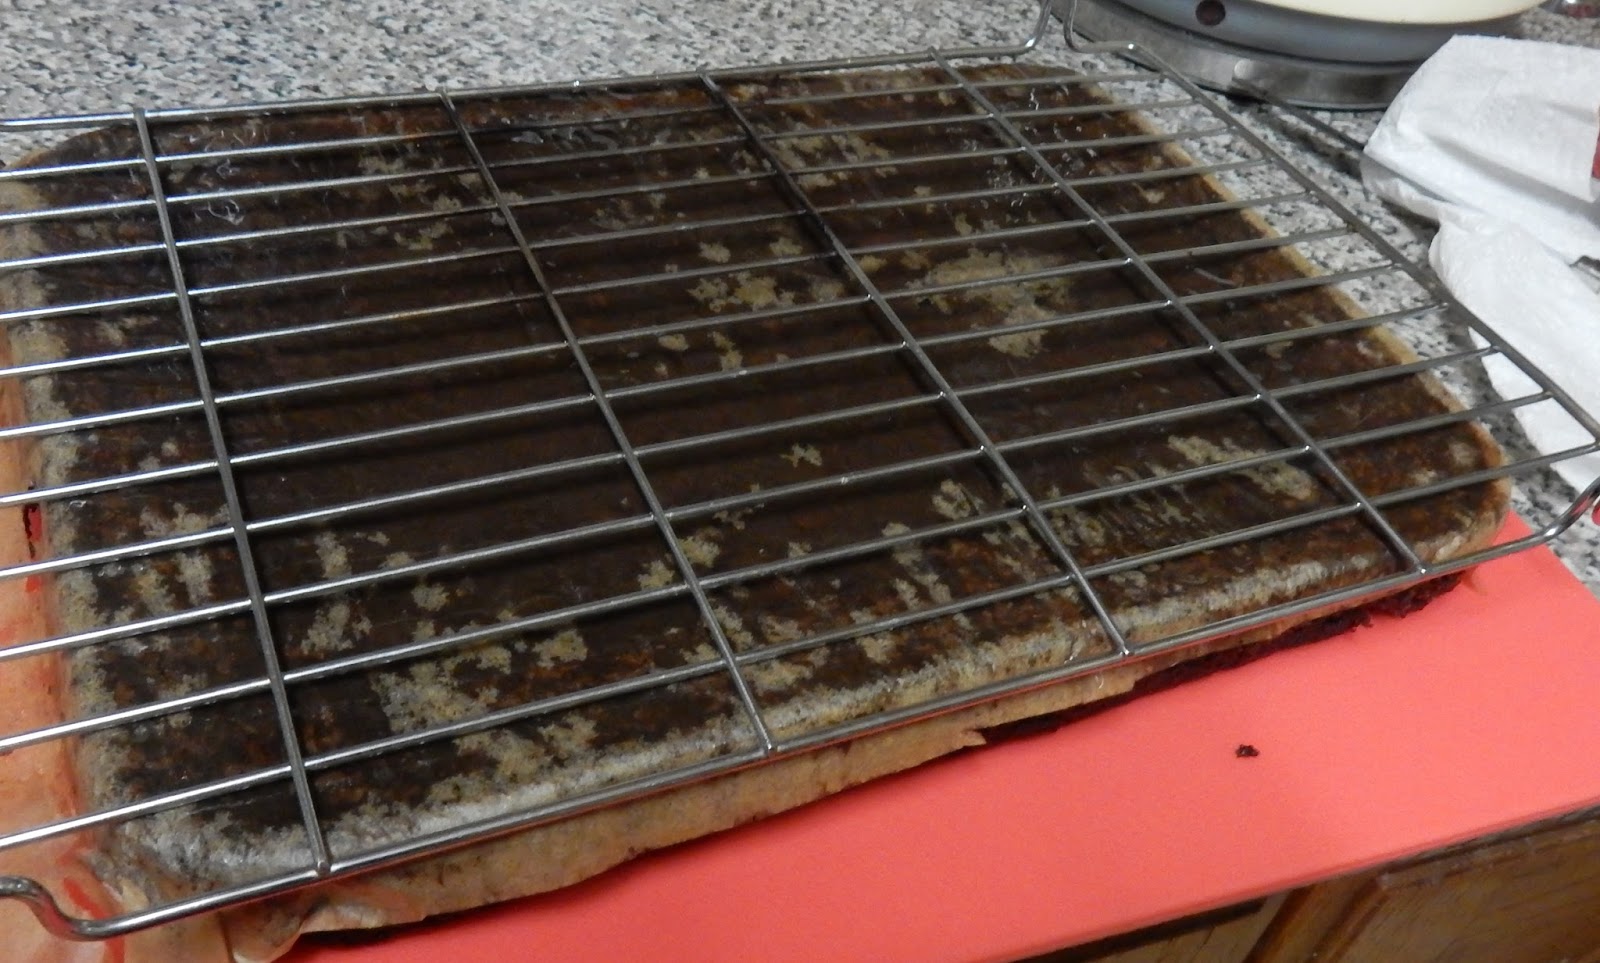
Pour into your lined tin & bake for about 45 minutes.  Properly cooked, brownies are still soft in the middle of the pan with a light crust over the top.  Let sit for 10-15 minutes in the tin, then turn out onto a wire rack like so:

Put the cutting board on top of the pan.


               Flip so the cutting board is on the bottom, then lift off the pan.


Put the wire rack on top of the brownies.


 And flip again.


You could remove the paper before the final flip, but because I was using the cheap stuff, I waited until the brownies cooled in order to have fewer chunks come off with the paper.  You can see that a hunk came away when I flipped the brownies, so I was very brave & ate it.

Icing.  In my early trials, I used this Mary Berry icing (from Mary Berry's Cookery Course):

I used a tea strainer because I'd already washed the sieve.
Add 3T of sifted cocoa powder & 4T of boiling water to 25g of cubed unsalted butter.  Stir until smooth.  Sift in 225g icing sugar.  Leave to cool, then spread over the uncut brownies with a palette knife.  Allow to set, then cut into squares. 

The Europeans in my fold loved this icing, but I suspect Americans have a different idea about what constitutes suitable brownie frosting.  

Mary Berry icing.
By the time I got to my vegan Thanksgiving brownies (see photo above), I’d switched to Betty Crocker frosting (what else) but in my opinion, this current recipe is way too rich for anything but a little dollop of vanilla ice cream.

Cut into squares (1.5” square is the perfect size for me) & keep in a sealed container or freeze.  An easy, slightly decadent dessert that’ll please all your chocolate lovers!


Friday, 13 January 2017

If There's Cheese in the Refrigerator


Mary Berry's HUMONGOUS cheese straws.


When I was a kid & we pestered Mom for snacks, her favourite answer was, ‘There’s cheese in the refrigerator.’  

If you’ve got cheese, Parma ham, & a roll of puff pastry, you can eat this instead.


1 packet all-butter puff pastry
3T Dijon mustard
75g Gruyère cheese (grated)
4 slices Parma ham
1 beaten egg
flour for dusting
(from Mary Berry's Foolproof Cooking)

Before you uncurl the pastry, let it sit at room temperature for at least 10 minutes, or it'll break.  Gentle spread it out on a floured surface, then take a rolling pin to it until it’s at least 10x14”.  You’ll be folding this over twice, so if, like myself, you’re no fan of more pastry than filling, make your rectangle slightly larger.  Be sure it’s thick enough that the innards you’ll be putting into it won’t burst out of the pastry.

Slap on some mustard, going as close to the edge as you can.  You’ll need some for later, so don’t use it all.  I never measure how much I use, but then, I like my mustard, so it can't be too much.  Dijon will give a nice subtle complement to your straws, but if you like a stronger mustard taste, experiment with your favourites. 

My own Hag Improv is to sprinkle fresh herbs (parsley, dill or chives) onto the mustard, so I can kid myself that I’m getting Siobhán to eat some greens.  Crushed garlic or little chilli flakes’ll give this a nice kick, too.  Whatever you add, spread it over the entire surface & gently pat to make it stick to the mustard.

Sprinkle about ⅔ of your cheese on next, again as close to the edge as possible.  I have to admit that I use about 4 times what the recipe calls for, cuz I do love my cheese even more’n I love my mustard.  I also mix cheeses, depending on what’s in my crisper.  The best combination for me to date is half Gruyère, half Parmesan, both freshly grated.   Give the cheese a pat to make it stick, cuz you'll be moving things.

Single layer of very thin Parma ham.
Fold the pastry in half with the cheese on the inside.  Like jumping in a pond, do it quickly – you can tidy up the edges once you've folded it.  

Roll this folded bit enough to the seal the pastry, refreshing the flour dusting as you go, then slap this new surface with some more mustard.


Line up your parma or other spicy meat in single file across the whole pastry, then pat it a little so it stays in place.  If you like your meat, you may scoff at only one layer, but you’ll be folding the pastry again which will double it – you don’t want to knock out the other flavours.  But hey, if you like your meat as much as I like my cheese, double away.

Fold the pastry over for the last time, then roll it again.  Brush with beaten egg, & sprinkle about ⅔ of the remaining cheese on it, then press down to get that cheese to stay there.  


6 long strips.


Here, Mary Berry cuts the pastry into 6 sections, but I find that enormous.  


Instead, I cut the pastry into strips of about 1½” in width, then cut those strips into 3 or 4 smaller sections.  However big or small your strips are, transfer them to a paper-lined baking sheet.


A pan of the little guys.

If doing the 6 longer strips, give them 3 or 4 good twists to hold them together.  With the smaller strips, you can twist twice or pinch them together in the middle.  Mary Berry stops here, but I dab all the newly exposed surfaces with the beaten egg & add the last of the cheese to these surfaces.  Chill for about 20 minutes while the oven heats itself up.

Bake at 220C or 200 fan (Gas 7) for 20 minutes, then reduce to 160/140/Gas 3 for about 10 more minutes.  I haven’t found a difference in cooking time between the long & short strips, but since it’s cheese, keep an eye on it.  You know yourself how no oven cooks the same.

Cool on a wire rack.  Mary Berry says they’re best warm, but the small ones are great finger food at a party or for a quick snack.  In fact, this is the first recipe Siobhán has asked me to stop making.  If they’re in the house, she simply can’t stop eating them. 

Where would I be without my Mary Berry cookbooks?


Mom, I’m hungry!  

There’s cheese (straws) in the cupboard!